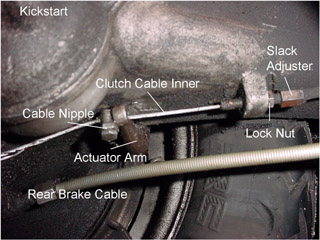
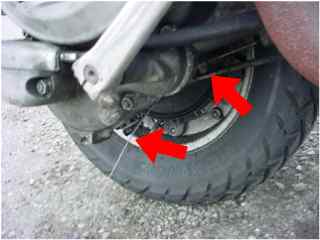
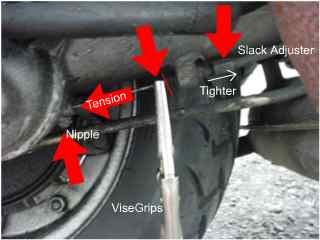
Vespa Maintenance Guide


Clutch Cable Renewal

This project was inspired by my Vespa's adorable spite. When I took off friday afternoon (to a scooter meeting nonetheless) my clutch was limp and the handlebar would not spring back. I thought, "maybe the little nipple came off the cable", but the cable nipple was still firmly attached. I then yarded on it with a pair of visegrips and about 4 of the cables came out onto my lap. This cable was broken, indeed. Here is a step by step method for renewing your clutch cable. It took me about 1 hour to complete for the first time. I think if I did it again, it might take 10 minutes.

Tools & Parts Needed
Bearing & Chassis Grease
Inner Cable (I used a tandem bicycle rear deraileur cable and had plenty of room)
If you need to purchase a new outer, follow the guide on scooterhelp.com
7mm box wrench or spanner
8mm box wrench or spanner
Philips Head Screwdriver
Q-Tips
Rubber Gloves (personal preference. This is a mesy job :))
At Least one Pair of Visegrips (two helps)

Procedure
The tools Step 1

Start by unscrewing the solderless nipple. if it is really tight, use a pair of visegrips to stabilize the nipple body and use a bit of WD40 to free the nut. Once it is unscrewed, remove it completely from the cable and store it in a safe place.


Inner tube Step 2

Unsrew the Philips head screw in the handlebar assembly to free the lever from the bars (watch for washers). Once it is free, pull the cable until it is completely out of the outer tube. Grease the new cable down its entire length with large amounts of bearing grease (do it with gloves). Insert the new cable down the same hole the old one came out of. Push it bit by bit. There should be no snags. If there are snags in the cable, renew the outer cable as well.


Filler up Step 3

Here is a picture of where my cable snapped. Hopefully, I won't have this happen again, given the amount of grease I used, but it is probably inevitable. I have been told cables have a life of about 6 months in everyday riding.


push it in and spread it around Step 4

Here is a shot of some of the materials used in the job. Remember to always lubricate the cables. A big tub of bearing & chassis grease costs 5 bucks and will save big headaches in the future.


Filler tube Step 5

The inner cable will fall out of the other side. Loop the cable through the clucth arm and replace the nipple from earlier. Don't cut the cable yet. Tun the Slack Adjuster until it is all the way in.


Alignment Step 6

Now yard on the end of the cable and pull until it seems tight, this will take up all the slack in the inner cable. once it seems tight, clamp the visegrips onto the cable so they rest on the slack adjuster. this will hold it tight while you fit the finnicky nipple. push the nipple right up against the clutch arm and tighten it, using another set of visegrips to stabilize the thing.


Tighten evenly Step 7

Now you will have to adjust the clutch. To do this turn the slack adjuster out (tighten it as shown) about half way. There is a fair bit of play in the clutch, so pulling it forward a bit should be okay. Get on the bike and start it -- in neutral of course. Put her into first (you may want a helmet). If it catwalks (does a wheelie), you have to tighten the slack adjuster. If it stalls after shifting into first, you are getting close. Keep tightening the adjuster until the bike runs smoothly after shifting into first. When you have finished calibrating the tension, cut the cable 3 inches or so from the nipple.


You should now be accomplished in the Tao of clutch cables. Some extra notes: I used a 2.5 meter cable (about 8.2 feet) from a bicycle shop in my city. I would reccommend using the real Vespa cables if not only for the guarantee of operation. I was in a pinch, I will let everyone know when the tandem cable breaks, in case they are inferior. The metal used for the the cable was stainless steel. Happy Scootering!

back to top previous page

All Material Copyright 2001-2024 by Richard Hoar. Use at your own risk.