Dropping the Engine
If you are getting into more serious engine repairs, such as rebuilding, replacing seals, changing the cruciform, fixing the clutch, changing bearings or fixing the kickstart mechanism, it is highly recommended that you drop the engine out of the frame. Not only will this give you more room to work, but it will also lower the risk of damage and lost parts in the engine. Dropping the engine requires two people and a solid hour's work. You will have to strip the frame electrical and cable connections, otherwise the engine will snag as it is pulled away. Take care not to rush this step and perform it indoors so weather does not expediate the work. Since this operation will lead to cracking the cases, it is a good idea to buy all the seals (see part list) so you can replace them when the repairs are finished. Any good seals not worn or see through, in the case of gaskets, are always an asset. Replace them with a new seal, but keep the old one in your toolkit. This is a major operation, but don't let it seem intimidating. Vespa engines are relatively simple inside. Just work in a clean environment and proceed slowly if you are unsure about a part. MAKE SURE YOU RUN THE BIKE WITH THE FUEL TAP SET TO "OFF" UNTIL THE ENGINE DIES OUT, SO NO GAS IS SPILLED!!! A Haynes manual alongside this tutorial will help greatly.
Tools & Parts Needed
Socket Set (7-22mm)
Spanner set (7-22mm)
Long Handled Screwdriver Set
Spark Plug Wrench
Disposeable Shop Towels
A can of Carb Cleaner
A can of WD-40
Split Pin for Rear hub
Metal Hammer
Visegrips
Needlenose pliers
A length of pipe larger than the diameter the handle of your socket driver
A Large Chisel (see below)
A large bag and electrical tape
A clutch Cable inner
A rear brake cable inner
Buy the following parts at your discretion
Set of Woodruff Keys (Flywheel and Clutch side)
Rear brake Shoes
Gaskets: Case gasket, Air Box to Case gasket, Selector Box Gasket, Clutch Cover O-Ring, Cylinder to Base Gasket, Oil Drain Plug Gasket.
Seals: Flywheel Side Seal, Clutch Side Seal, Rear hub Seal
Procedure
|
|
Step 1
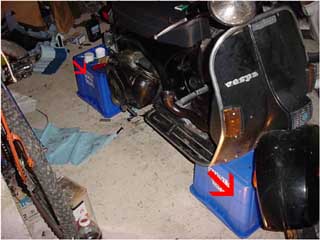
Prop the bike on large boxes and shim further with wood planks. This will make the bike more accessible and less susceptible to falling over. After standing the bike, disconnect the ground lead from the battery to prevent short circuits.
|
|
|
Step 2
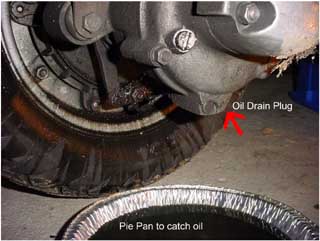
Undo the oil drain plug screw with a spanner and allow oil to drain out of the bike. There is not much oil in the gearbox, so a 10" pieplate should sufficiently hold the oil. Drain the oil into a cranberry juice bottle using a siphon and take it to the nearest recycling station.
|
|
|
Step 3
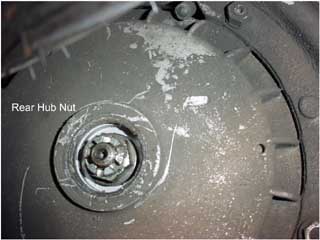
Remove the split pin in the center of the hub with a small pair of pliers. Using a 22mm Socket, loosen the castellated nut. If it refuses to budge, have a friend apply the rear brake add the pipe length to your socket handle to give more leverage. The bolt should budge quickly. Collect the castellated nut and the large spacer washer
|
|
|
Step 4
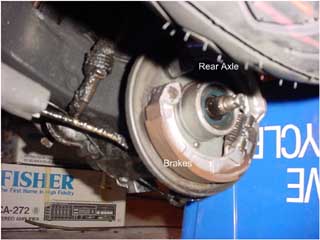
Pull the wheel away from the hub to reveal the brakes and rear axle. If the brakes are considerably worn, indicated by poor stopping or inability to lock the rear wheel, replace both shoes AFTER the repairs to the engine are completed. Wheels tend to be covered in soot from the exhaust, wipe clean with a small spray of carb cleaner.
|
|
|
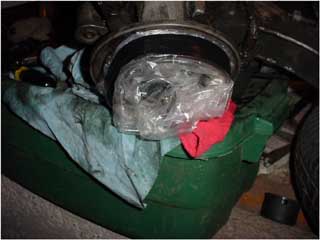
Step 5
Wrap a clean plastic bag around the brake shoes making sure the lip of the bag pushes behind the shoes and tape it with vinyl electrical tape. Since oil will spill everywhere during the disassembly, this step is very important to prevent damage to the brake shooes.
|
|
|
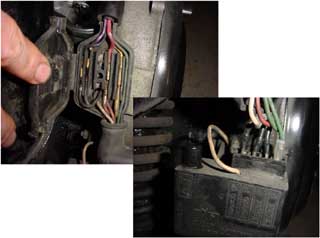
Step 6
Open the juction box by removing the screw in the top of the door and disconnect all connections inside the box noting wiring configuration. Pull back the CDI rubber to remove the connections from the CDI box. Pull the frame electrical connections from the top junction box.
|
|
|
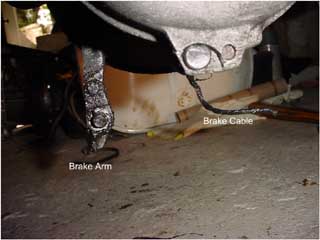
Step 7
Disconnect the rear brake cable from the brake arm. A small socket will loosen the nut and allow the inner to slide out. Pull the inner cable and the outer cable completely clear of the engine.
|
|
|
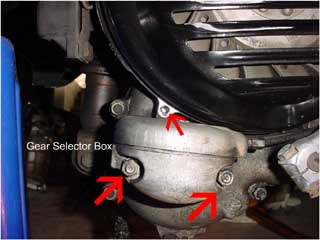
Step 8
You will have to remove the gear selector box. Remove the Cylinder and flywheel shroud by removing their respective screws. The Selector box cover will lift away with the flywheel shroud. Undo the small nuts on the selector box and carefully collect the hardware under the nuts.
|
|
|
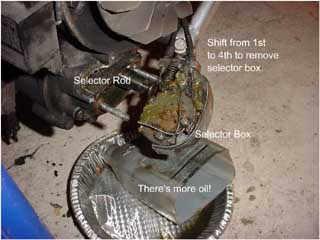
Step 9
Get a friend to shift from first gear to fourth gear. This action will lever off the gear selector box and allow you to remove it from the engine. Have the pieplate ready for more oil. You don't need to loosen the gear selector cables, in fact I don't reccomend it unless the selector box requires further inspection.
|
|
|
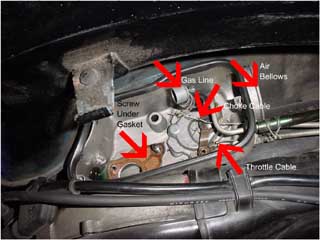
Step 10
You will have to remove the carburettor and air box. There is a dissassembly guide in the carburettor rebuild section if this picture is not completely clear. Undo the arrowed screws to remove the carb box. As usual, leave the oil injector alone unless it requires attention.
|
|
|
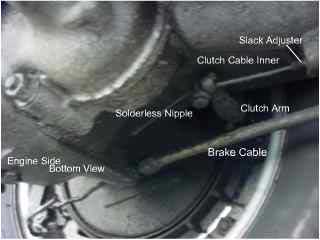
Step 11
Remove the clutch cable by removing the little 7mm nipple on the end of the cable. Pull the inner and outer clear of the engine.
|
|
|
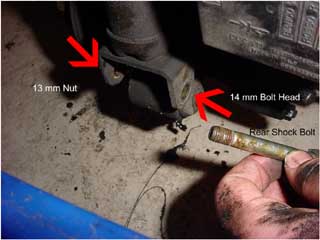
Step 12
Remove the rear shock bolt. The bolt uses two different sized wrenches as pictured. remove the fasterners and drive the bolt out with a hammer if neccessary.
|
|
|
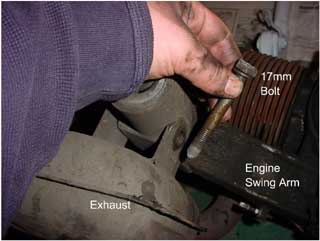
Step 13
Remove the 22mm nut from the main engine bolt. Get a friend to catch the engine as you drive out the bolt with a punch and hammer. Removing the spare tire will give you room to drive the bolt. Pull the engine away from the bike with the exhaust attached.
|
|
|
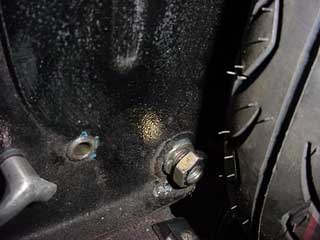
Step 14
Remove the 17mm exhaust nut to loosen the expansion box.
|
|
|
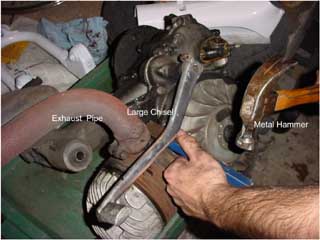
Step 15
Use a large chisel between the lip of the exhaust manifold and the cylinder to lever the the exhaust away from the engine. Depending on the amount of rust on the exhaust, you may need a hammer to get enough force to lever it away.
|
Congratulations, you successfully dropped the engine. You can now continue to repair the engine components. But not before food :)!!! To put the engine back in, it is as simple as reversing the instructions. I ran into a bit of trouble with worn cables reassembling my Vespa, so make sure to have spares.


All Material Copyright 2001-2026 by Richard Hoar. Use at your own risk.
|