Carburettor Rebuild
The carburettor on all Vespas is something that should be kept clean and sealed. For this
tutorial, I have a disgusting Si24/24E carburettor that I'm going to rebuild, including
the Oil metering device. If your bike is running nicely and acceleration is sharp, the carb
is probably in tip-top shape. However, some tell tale symptoms that your carb needs rebuilding may include:
mysterious gas leaks (typically ones where the gas is trickling out that little black rubber thing on the bottom of the carb box), bad acceleration or serious bogging at the top 3/4 of the gear range, lots of exhaust smoke, occasional misfires, hard starting when warm and improper idling. BEFORE STARTING THIS PROCEDURE: check your spark plug and make sure your HT Lead is not arcing, fix this problem before attempting a rebuild. When you're all ready to do a carb rebuild, then start with the tools and parts. It is a good idea to buy all the parts at once, because they're cheap. Just replace everything you can while you have the carb apart.
Tools & Parts Needed
Carb Gasket Set, Carb to Base Gasket, Fuel Filter, Float and Needle (call a parts dealer)
You may need a Carb Box Rubber Seal (See steps below)
Petroleum based all purpose grease
Carb Cleaner
11mm Deep Socket
10mm Spanner Wrench
Flat-Head screwdriver
Can of non-flammable Compressed Air
Cotton Swabs
No Lint Shop cloth
Paperclip
WD-40
Small Tube of Anerobic Thread-Lock
Latex Dish Gloves
Procedure
|
|
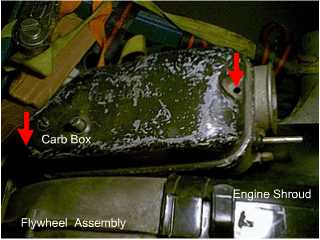
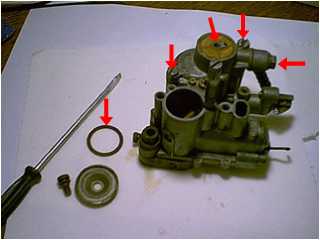
Step 1
Run your bike with the gas off until the engine dies. Start by removing the screws arrowed, this will remove the Carb Box cover to
reveal the meaty, juicy insides. When you re-tighten these screws, do it evenly
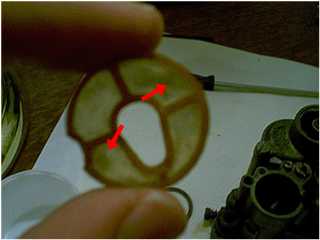
to avoid warping. When you remove the cover, be gentle, there is a rubber seal under
the lid. Inspect the seal for cracks; if it is missing or cracked buy a new one.
|
|
|
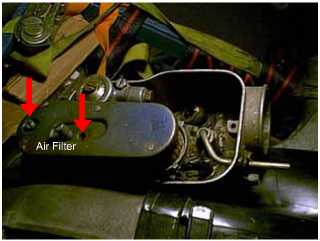
Step 2
Unscrew the two arrowed screws and pull off the Air Filter. This will allow you to get at the
carburettor body. The Air filter should not be dirty. It's important to clean the air filter
every time you even look at the carb.
|
|
|
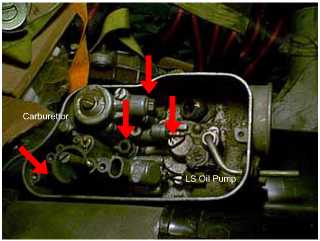
Step 3
In this step, you will prepare to remove the Carburettor body. To do this, you should
remove the choke cable (pull the plunger out and unhook the cable). Remove the nut
that holds the gas line to the carb body (MAKE SURE YOU EMPTY THE LINE OF GAS). Undo the 2
11mm Sleeve nuts to loosen the carb from the carb box.
|
|
|
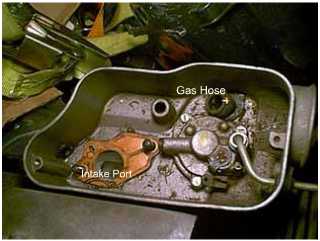
Step 4
Once you loosen the nuts, Pull the Carb body STRAIGHT UP and out of the box. You will
now be looking at your CRANKSHAFT! Put a little lint free shop towel over the intake port opening
(towel omitted for clarity) dropping screws down into the crankshaft would be BAD! The gasket over the
opening is the carb to base gasket.
|

|
|
Step 5
Cleaning the air filter is a pretty simple task. Since Carb cleaner has toluene in it, you should
probably wear some dish gloves while spraying it. Spray the inside of the air filter until the
carb cleaner liquid runs clear. Depending on how dirty the air filter is, this may take a while. When
it's clean towel it off. If there are any holes in the gauze replace the filter.
|
|
|
Step 6
Now whip out the Carb body and take off the fuel filter cover. Inspect the
fuel filter by popping it out with a screwdriver. Replace the gaskets when you
reassemble the carb - don't do it now, you may knick them with tools. Take note
of where everything goes.
|
|
|
Step 7
This is why you replace a fuel filter (shudder). If there is crud built up under the fuel filter, clean it with carb cleaner and cotton swabs. Remove the screws that hold the float cover together
(arrowed above) and pull out the float assembly - get a towel ready to soak up some gas.
|
|
|
Step 8
Once you get the float out of the carb body, you will have to push out the pivot pin to
get out the float needle. Displace the pin with a bent paperclip and all the stuff will
pop into your hand. Clean the float bowl with carb cleaner and look for cracks in the
wall. If there are cracks, you can use anerobic liquid gasket to temporarily fix the crack.
|

|
|
Step 9
Inspect the Float for cracks. If there is ANY gas inside the float, replace it. The float
should have squared edges, if there is damage to the needle seat or float, replace the float.
The needle should come to a narrow peak, if there is any crud on the top, replace the needle.
|
|
|
Step 10
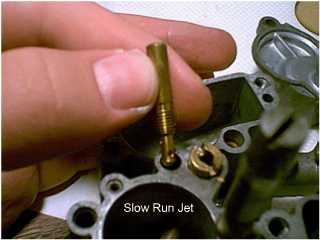
This is the slow running jet, check it for grime, use carb cleaner and compressed air to
clean it out. DO NOT PUT METAL OBJECTS IN THE JET TO CLEAN IT! Refit the jet and tighten until SNUG, no tighter.
|
|
|
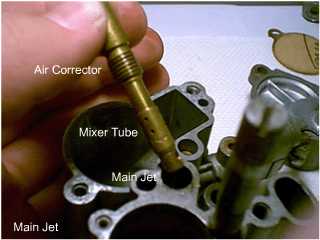
Step 11
This is the main jet. This jet is three separate pieces; only take it apart if you can't get it clean. check it for grime, use carb cleaner and compressed air to clean it out. DO NOT PUT METAL OBJECTS IN THE JET TO CLEAN IT! Refit the jet and tighten until SNUG, no tighter.
|
|
|
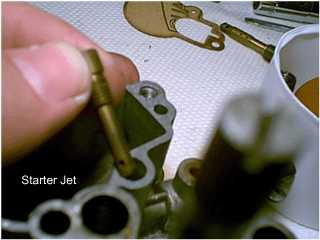
Step 12
This is the starter jet. Check it for grime, use carb cleaner and compressed air to clean it out. DO NOT PUT METAL OBJECTS IN THE JET TO CLEAN IT! Refit the jet and tighten until SNUG, no tighter.
|
|
|
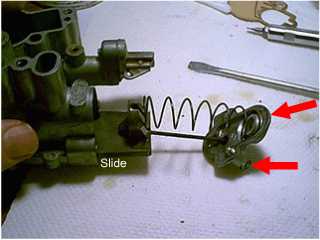
Step 13
Take out the two arrowed screws to reveal the slide. It's spring loaded, so hold it down as you unscrew the cover. Pull
out the slide and have a look, it should be dark grey with little to no scuffing. If the slide is really scuffed, replace it. The slide should slide from edge to edge in the neck of the carb. Spray some WD-40 along the slide rails.
|
|
|
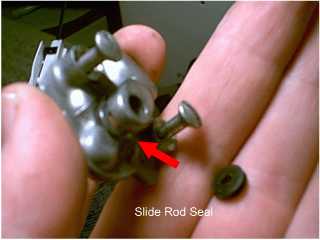
Step 14
To get at the throttle rod seal, pull the throttle rod through the hole in the slide cover.
a little black vinyl seal/spacer will fall out. if it is misshapen, replace it.
|
|
|
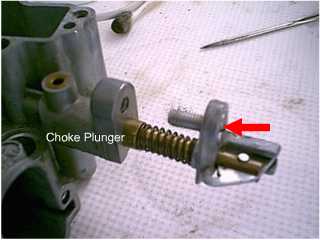
Step 15
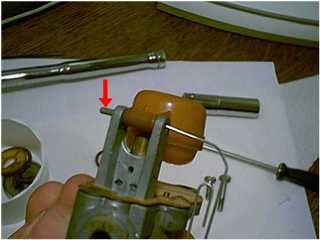
There's only one screw holding the choke plunger in the assembly. Remove the screw and pull out
the choke. if there is anything built up on the black seal at the tip of the plunger, clean it off
thoroughly. Use lots of WD-40 in the plunger chamber for a smooth action.
|
|
|
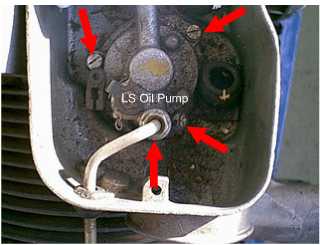
Step 16
We're finished the carb rebuild. You can continue to this step if your engine has seized from lack of oil, if your Oil Device is working, DON'T MESS WITH IT and put everything back together. First, remove and plug your oil line with a bolt. To remove the Oil Pump body, undo the three screws and loosen the plumbing.
|
|
|
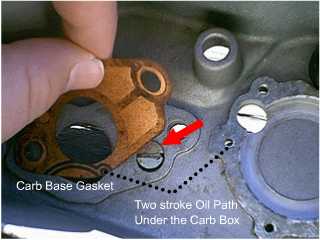
Step 17
If you have had a soft seize on an injected bike, you should probably remove the carb box completely and inspect the oil path
under the box. the box is removed by a small flat head screw under the carb to base gasket. DO NOT DROP
THIS SCREW INTO YOUR CRANKSHAFT!
|
|
|
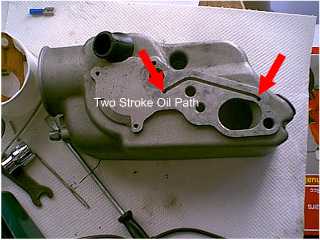
Step 18
The cables and hoses may make it difficult to disconnect the carb box. You should be able to flip it over while you're at the engine - this picture is for clarity sake. Make sure nothing is protruding into the oil path. if there is grime, scrape it off carefully and use as much carb cleaner as you like. If the gasket is bad (see through or ripped), replace it.
|
That's all there is to it. Once you have completed the cleaning, replace all the gaskets and hardware with the new ones, lube the moving parts with WD-40, and put it all back together in the reverse order. A few points consider: Tighten the screws on the metering device, the Sleeve nuts on the carb body and the screws in the box top evenly. If you don't, you risk warping the carb or oil pump (a bad idea). The sleeve nuts have Torque Specifications if you are lucky enough to have a torque wrench. If you don't have a torque wrench, tighten the bolts until they flatten the lock washer. The screw that holds the gas line to the carb body should have a drop of threadlock on the threads of the screw prior to installation. This will prevent The gas banjo from working it's way out and staining the garage floor.


All Material Copyright 2001-2026 by Richard Hoar. Use at your own risk.
|